An automation is a short series of emails that starts by itself: when a customer places an order, creates an account, or has not ordered for a while. Each automation has a trigger, optional conditions and up to five timed emails. Ready-made recipes cover the common cases, such as a welcome, a thank-you after the first order and a win-back. This feature is in Beta. The app needs "Email campaigns" on your plan. Plus and Pro include it. See Plan and billing.
Before you start
- The app comes installed on new stores.
- Your business name and postal address are filled in under Store details. An automation cannot be turned on without them.
- Every automation email is a marketing email: it goes only to customers who agreed to marketing emails. See Newsletter.
- Nothing is sent to customers until the store is live. Test sends to your team work before that. See Go live.
Set up your first automation
Open Automations in the Sales group of the sidebar. If it is not there, open the App Store, choose Email automations, then select Install and Turn on. See App Store.
Select Create automation. A new page opens with the recipes grouped by when they send.
Pick a recipe, or choose Start from scratch to build your own.
Enter a Name. Only you and your team see it.
Select Create automation under the name. The automation opens as a Draft. Nothing is sent until you turn it on.
Adjust it as described in Build and run an automation, then select Turn on.
The list shows every automation with its status and the last 30 days' sends, conversions and revenue. Switch between All, Live, Paused and Drafts, or search by name. A ready draft can be turned on straight from its row.
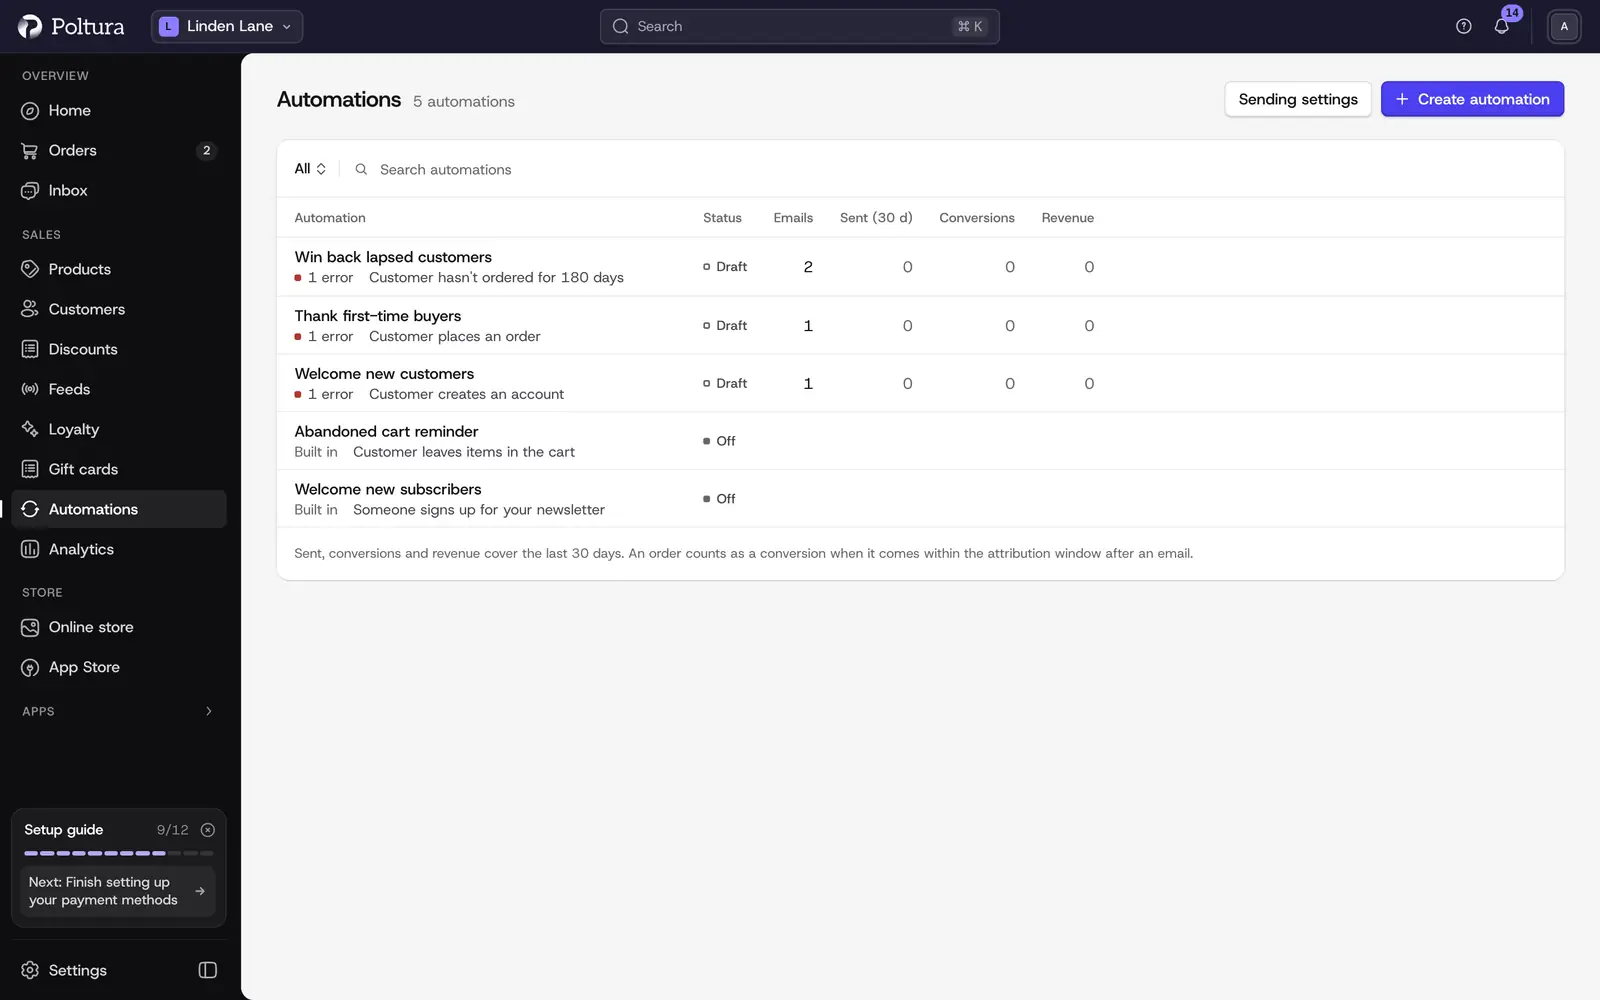
The list also shows two built-in rows, Abandoned cart reminder and Welcome new subscribers, under All, and under Live while they are on. They are set up elsewhere, see Abandoned cart reminders and Newsletter.
Settings
The app has no settings of its own in the App Store. Its emails use:
- Sender name and reply-to address: the store's sender for marketing emails, set under Settings → Emails.
Rules that every automation follows are on the Automations page: select Sending settings.
- Smart sending window: automations with smart sending on skip anyone who got an automated email within this many hours.
- Attribution window: an order placed within this many days of an email counts as that email's conversion.
- Quiet hours, with From and Until: emails due in this period wait until it ends.
- Time zone: used for quiet hours and for waits given in days. It follows the store's time zone unless you change it.
Select Save settings to keep the changes.
Build and run an automation
Open an automation from the list. The Flow tab shows it from top to bottom: the trigger, the conditions, then each wait and email.
Select Edit on Trigger and choose what starts the automation: Customer places an order, Customer creates an account, Customer stops ordering (with Days since the last order) or Account without an order (with Days since signing up).
Select Edit on Only if to narrow who gets the emails. Order conditions are Order total, Products, Categories and Which order; they need the order trigger. Customer conditions are Only customers with an account, Number of orders, Total spent, Customer groups and Shipping country. A customer must match every condition that is on.
Select the wait above an email to set how long after the trigger, or after the previous email, it goes out: in Hours or Days. 0 sends it right away.
Select Add email for a further email. On an email, Settings adds a Coupon. In its menu, Move up and Move down change the order and Delete email removes it.
Open More actions and choose Flow settings to set Re-entry (Once per customer, Again after a break or Every time), Stop when the customer orders and Smart sending.
Fix everything listed under Fix before turning on. Each item has a Fix link.
Select Turn on. The status changes to Live.
Pause stops new sends and Resume continues. To add an email to a live automation, pause it first. Delete automation under More actions removes the automation with its emails and its send history.
The numbers at the top, Sent, Conversions, Revenue and Skipped, cover the last 30 days. The Activity tab lists every send with its Status (Sent, Skipped, Failed), the Reason for a skip and the Converted order.
Write the emails
On the Flow tab, select Edit email on an email.
Open Subject & variables and write the Subject. Variables fill in values such as the customer's name.
Build the body with Add block. Keep the Unsubscribe block: an email without it cannot go live.
Switch Language to write the email in the store's other languages.
Check the result with Light preview and Dark preview.
Select Test send and pick a team member. Test emails can only go to members of the store's admin team.
Save the email and return to the automation.
To offer a discount, choose an existing code under Coupon in the email's Settings; the code fills the {couponCode} variable. Everyone gets the same code, and if the promotion ends, the email is skipped. Create the code first under Discounts.
Monthly runs
A run is one customer going through one automation. It counts once, when the first email of that run is sent, however many emails follow. Customers who are skipped before their first email do not count, and neither do test sends.
| Plan | Runs a month |
|---|---|
| Plus | 2,000 |
| Pro | 20,000 |
The allowance starts again on your billing day every month, on yearly plans too. The automations list shows how many runs you have used and when they reset. Near the limit, a notice offers more room.
At the limit, runs already under way still send all their emails. New runs are skipped until your next billing day, with the reason Monthly run limit reached on the Activity tab. To make room, add 1,000 more runs a month or move up to Pro. See Plan and billing.
Good to know
- An automation can send at most five emails, and a wait can be at most 365 days.
- The two day-based triggers are checked every 15 minutes. Only customers who reach the day count after you turn the automation on are included.
- With the triggers Customer stops ordering and Account without an order, the automation always stops when the customer orders.
- There is no open or click tracking, and no automatic translation in this editor.
If something goes wrong
- Turn on is blocked. The automation has errors. Common ones: Add an email, Email is empty, Unsubscribe line missing, Add your business details, Coupon not available.
- "Order conditions need the order trigger". Remove the order conditions or switch the trigger to Customer places an order.
- A customer did not get an email. Open the Activity tab and read the Reason: for example Not subscribed to marketing emails, Got another automated email shortly before or The store wasn't live yet.
- New customers stopped getting emails, with the reason Monthly run limit reached. You have used this month's runs. Add more runs or move up a plan; see Monthly runs.
- "Someone else changed this automation." The latest version is loaded. Make your change again.
- "Pause the automation to add an email." Select Pause, add the email, then Resume.